You’re a teacher and you have lesson plans, activities, homework, projects, and tests to organize for all your students. Between juggling multiple classes, grading, meetings, and a personal life, managing all these assignments efficiently can feel like an impossible task. But what if there was an easy way to create, distribute, grade, and analyze assignments all in one place? With Skooler’s Assignment and Assessment module, you finally have a simple solution to streamline the entire assignment management process. In just a few clicks, you can set up an assignment, share it with students, check on their progress, grade their work, and gain valuable insights into how they’re doing. This guide will walk you through how to master Skooler’s Assignment and Assessment tools so you can spend less time organizing assignments and more time teaching. Get ready to transform how you manage assignments and take back your time.
Creating Assignments
Creating assignments in Skooler is a breeze. Just log in to your Skooler account and select the “Assignments” module from the left menu.

- For assignment, click “Create Assignment” button; for assessment, Click the “Create Assessment” button at the top of the page.
What’s the difference between an assignment and an assessment?
In Skooler, assignments and assessment can both be used to see how well a child is performing in a subject. The key difference is when creating both, you have the option to add a quiz to an assignment but this feature isn’t available when creating an assessment.
- Give your assignment a descriptive title and select the classes/groups the assignment applies to.
- Choose the subject, you have the option to add a cover image and a detailed description/ instructions for the students. Be very clear in explaining the requirements, expectations, and objectives of the assignment. You can format the text, embed images, add hyperlinks, and more.

- Choose your scoring format, publishing date (the date the assignment is sent to the students) and due date. At this point, you can also add a hand-in document.

- Scrolling to the top, the student tab shows you the students in the class who will be receiving the assignment.

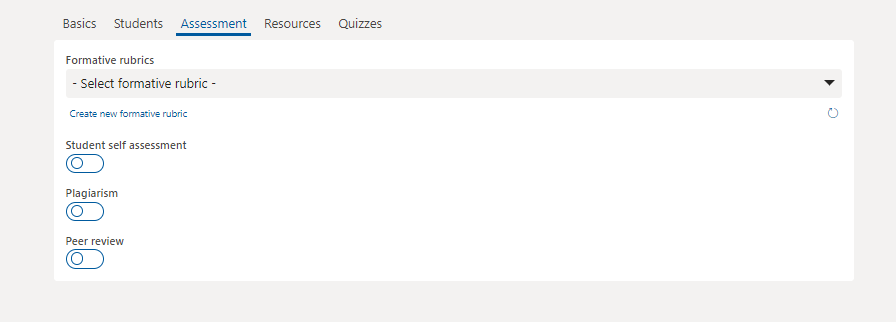
- From the assessment tab, you can add a formative rubric which you can use in grading the assignment. You can also enable the student self assessment, plagiarism and peer review options.

- Under Resources, you can attach any necessary files or resources for the students to access. This could include worksheets, reading passages, multimedia, and so on.

- Under Quizzes, you can create a new quiz or add an existing quiz. (The Quiz module will be critically examined in subsequent blog posts).
- Review all the details and settings, then click “Publish Now” to release the assignment. It will now appear on students’ dashboards and they will receive a notification that new work has been assigned.
Skooler makes assignment management simple through an intuitive interface and useful features. Following these practical steps will have you creating and distributing assignments in no time. Focus on providing clear instructions, setting reasonable timelines, and leveraging the powerful tools Skooler offers to keep students engaged and help them succeed.
Facilitating Online Submissions
Once your assignments are created in Skooler, it’s time to get students submitting their work online. Skooler offers a few options for hassle-free submissions so you can choose what works best for your needs.
File uploads are a popular choice. Students can submit documents, spreadsheets, presentations, images, audio, and video files. Just specify the allowed file types and maximum upload size when setting up the assignment. This method works great for essays, projects, and other assignments where students create digital files.
Regardless of the method, Skooler makes it simple for students to submit their assignments on time. They receive notifications as due dates approach and can submit with a single click from their dashboard or the assignment page. Submissions are automatically saved as drafts, so students never lose their work, and you have a complete record of their progress.
Once students start submitting, you’ll get an alert. You can then log in, view the submissions, and begin evaluating and providing feedback. It’s all streamlined to save you time while still giving students a straightforward online experience. With Skooler’s assignment management features, facilitating digital submissions and monitoring student progress is easier than ever.
Conclusion
So there you have it, the key tools and techniques for streamlining assignment management in your school using Skooler. By creating well-designed assignments, setting clear expectations, and monitoring student progress, you’ll gain valuable insights into how your students are learning and mastering key skills. You’ll save time, reduce workloads, and empower students to become more independent and accountable in their learning. With the tips and best practices from this guide, you’re well on your way to unlocking the benefits of Skooler’s Assignment and Assessment module.
Want to learn more? Visit our website and schedule a demo today!


